When you replace recessed lighting, you can make dramatic changes to the look and function of your home with just a little know-how.
Recessed lighting unobtrusively places task lighting where you need it in your space and fills in gaps in down-lighting to unify a large room. However, when you change how you use a space, such as when you add an island to your kitchen or transform your office into a nursery, your lighting needs may change, too.
Change the Look with Decorative Trim
If you want to keep the recessed lights you have but alter their appearance, try decorative trims that sit over them and make them appear to be flush mount ceiling lights. This gives you the flexibility to change your lighting style without committing to a full-scale conversion.
Decorative trims are available in just about any style you can imagine. Glass, chandelier-type trim hangs from flush against the ceiling and refracts light throughout the room, while a colored-glass trim piece turns an everyday can light into an artistic focal point that delivers a soft glow. Hammered metal adds an industrial appeal, and frosted glass delivers a traditional look.
While you can find trims in almost any shape you want, make sure the one you choose is compatible with your current type of recessed lighting. For example, not all trims can handle the heat of line voltage recessed lights. Double check your light’s parameters before you settle on a type of trim.
How to Install Decorative Trim
Adding these decorative trims to your existing lights is relatively easy. You’ll need a ladder to reach the ceiling and some needle-nose pliers.
First, set up your ladder beneath the light and remove the bulb from the socket. Next, locate the plastic or metal tabs that sit perpendicular on both sides of the can light. They should have either coil springs or the bottom of spring stems attached to them. Using your pliers, grab a spring and pull it through the corresponding hole in the housing of your new trim, then do the same with the other spring. Push the trim against your ceiling for a flush-mounted look.
Convert a Recessed Can to a Non-Recessed Light
When you take on a major renovation or change how you use a space, sometimes even the best recessed lighting is no longer the right choice. In those cases, you can use the existing wiring to replace recessed lighting with a pendant or chandelier fixture using a recessed light conversion kit or change the entire setup of the light and use a standard fixture.
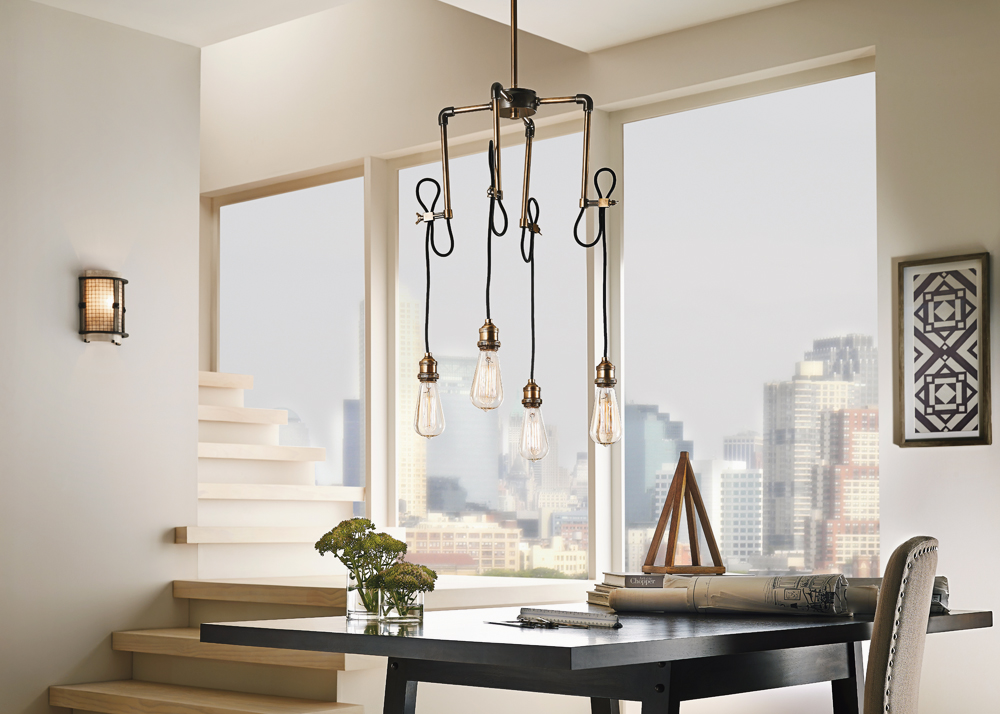
Changing to a Pendant Using a Conversion Kit
A conversion kit requires a bit more effort than installing trim does. Still, the dramatic effect of a pendant light is well worth it when other recessed lighting options won’t do. To get started, choose a pendant light that speaks to your personal style and, just as importantly, has the same-shaped connector at the top as the hole in your ceiling. For example, if you plan to replace a round recessed light, make sure the cap of your new light is round, too. If the cap isn’t big enough to cover the hole in which the current light resides, pick up a ceiling medallion to bridge the gap between the cap and the ceiling.
Next, check the conversion kit package to find out what tools you’ll need. Then, gather a ladder, some painter’s tape and a circuit tester. Go to the circuit breaker and turn off the power to the light you’re replacing. (Use the circuit tester periodically throughout the process to make sure the power is off.) Remove the light bulb, then turn the casing and undo the clips on the sides of the recessed fixture to take it out of the ceiling. Leave the light socket where it is, and follow the instructions to install the converter kit.
Once the kit is hanging as part of the socket, get the new fixture ready for mounting. Connect the pendant to the cap, and thread the wires through the fixture, cap and medallion, if you’re using one. Following the instructions that came with the light fixture, connect the wires to the converter kit.
Time to test your connection: Twist a light bulb into the new fixture, then switch on the breaker to see whether the wiring works. Once it does, switch the breaker back off for safety.
Next, use painter’s tape to secure the medallion to the ceiling around the open hole. Mount the fixture according to its instructions, including the cap, and remove the tape afterwards. Remember to turn the circuit breaker back on again once you’re done.
Changing to Standard Fixtures
Depending on the type of recessed lighting you have, you might be able to find a kit to help you change it to a regular fixture. In particular, new-construction fixtures — fixtures to which you had access either through an attic or during construction — are bulky and fit between joists or on T-bars in a drop ceiling, so a conversion kit works well to replace these.
Otherwise, if you want a standard fixture instead of recessed, you may need to do some remodeling in the process. That’s because normal lighting needs an electrical box that attaches to the ceiling. You can make the process easier by using a box for a ceiling fan. Here’s how.
Before You Begin
You have to take care of a few basics before you get started with your replacement project. First, identify any special circumstances that might affect the safety of your new light. If your renovation is in the bathroom, for example, you may have wet-location rated recessed lights. If so, your replacement fixtures also must stand up to wet conditions. Then, choose your fixtures and get ready for installation.
Preparation
Next, gather your supplies and tools:
- dropcloth
- ladder or step ladder that reaches the fixture
- safety glasses
- screwdriver
- circuit tester
- adjustable wrench
- needle-nose pliers
- wire cutter and stripper
- putty knife
- drywall
- drywall clips
- joint compound
- sandpaper
- sandpaper block
- plastic or other non-metal cable connectors
- masking tape
- ceiling fan electrical box that comes with a retrofit brace
Follow The Steps
Now it’s time to install the new fixture. The work itself is straightforward, as long as you have patience.
- Turn off the breaker. Before you start working on anything related to the fixture, cut power at the source. Don’t just cut off the power at the wall switch — current can still flow through.
- Set up your work area. Lay down a drop cloth and set up the ladder so you can reach the can light easily. Now’s a good time to don your safety glasses, too, so debris doesn’t fall in your eyes.
- Remove the old housing. Using the ladder to bring yourself as close as possible to the fixture, first take out the existing light bulb and the trim ring. Then, turn on the light at the wall switch, if there is one, and use the circuit tester to make sure that no power is reaching the socket. Turn the switch back off for good measure. Use a screwdriver or the pliers to take off the remodel clips.
- Take down the recessed fixture. Pull the fixture and its electrical box from the ceiling. Open the box, and mark the wiring connections so you can reuse the schematic later. Then detach the fixture’s wires from your home’s wires and connectors.
- Install the retrofit brace. Reach into the hole where the old fixture used to be and figure out which way the joists lay. Then, place the brace bar into the hole so that the attachment legs point at them. Center the brace bar over the hole and set the feet so that they hold the bar at the right height. Use a wrench to tighten the bar so it seats firmly between the studs.
- Attach the electrical box. Make holes on both sides of the electrical box. These holes should correspond to the house wires that have to connect. Slide a cable connector into each one. Follow the package instructions to attach the box to the brace, then center the box in the ceiling gap and tighten it. Next, thread the wires into the holes, with at least a quarter inch of sheathing sticking out past the connectors and 3 inches past the box face. Move the wires out of your way.
- Patch the ceiling. Fix the hole that’s left in the ceiling using drywall. Depending on the size of the hole, you can use putty to hold the drywall in place directly or use tape or clips to pin up the drywall while you putty it. Let the putty dry before you try to install the new light.
- Install the new fixture. Follow the instructions that come with the light.
- Test your work and clean up. Turn the breaker back on after you’ve connected the new light. Then, test to make sure the light works. Once it does, fold the dropcloth inward on itself to keep from spreading drywall dust, putty and other debris on your floor.
Armed with options abound at different skill levels, you have the know-how to replace recessed lighting in your home! No matter which one you choose, with a little work your house will look stellar in no time.
2 Comments
Pictures of the steps would make these instructions possibly useful!
You’re right, that would be a great update to this blog. Hopefully you got some use of our written instructions. Feel free to reach out if you have any questions about converting your recessed lighting. Good luck on your project!