How to Install Landscape Lighting, an Outdoor Lighting Tutorial
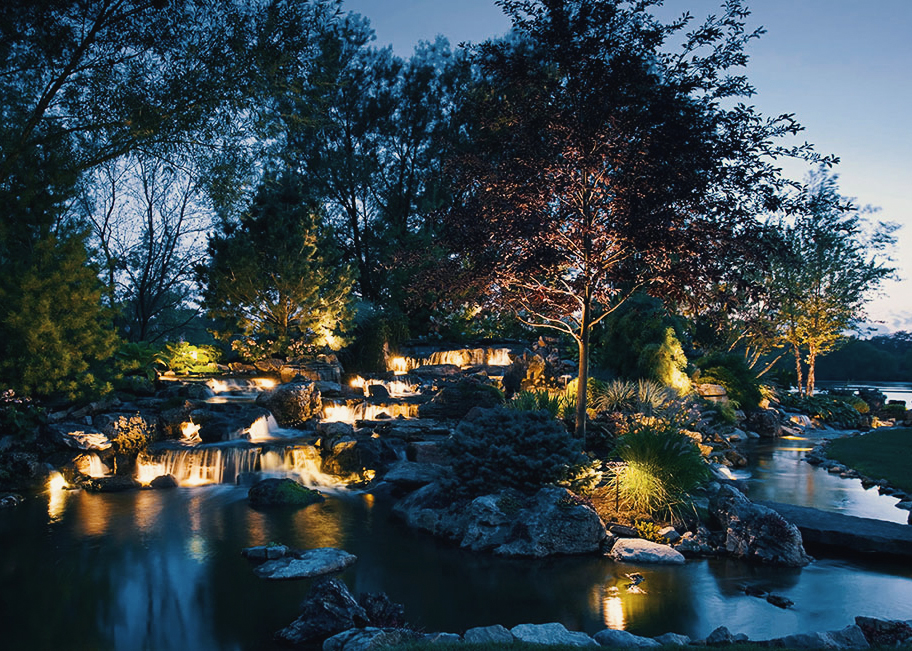
A brilliant landscape lighting scheme helps your yard transition smoothly from a sunny daytime paradise to a warm and welcoming nighttime oasis. Learning how to install path lights is a big step in crafting an effective lighting plan. Outdoor lighting boosts curb appeal and showcases the hard work you put into landscaping. Well-placed lights with flattering nighttime colors create the perfect vibe.
Before You Begin
Installing path lights isn’t a project to jump into; instead, spend some time planning and verifying that you have the proper items and tools for the task. Although this process does have several steps, it is very beginner-friendly. Even if you have never done any electrical or lighting work, you can install a path light. Prepare to devote a full day to the job. Stop and consult a professional if you run into complications at any point.
Let Knowledge Be Your Guiding Light
Choosing the ideal path lights for your landscape is simple when you take key factors into account. There are several types to consider. Solar lights turn on automatically when it is dark and draw their energy from daytime sun. Line voltage lights connect directly to the house’s 120-volt current, creating a bright lighting scheme. However, line voltage lighting requires professional installation. Low voltage lighting taps into the home’s 120-volt current, transforms it into a 12-volt current and uses it to illuminate the yard. Low voltage lighting is extremely safe, energy-efficient and affordable. This guide covers low voltage path lighting installation.
Special Features
Outdoor fixtures come with a variety of special features that add value, save money and make lighting more convenient. Energy-efficient lighting meets strict standards. It reduces electricity expenses and makes it easy to only use lights when necessary. A Dusk to Dawn light contains a photocell that automatically activates the fixture at dusk and turns it off at dawn. Dark Sky-approved fixtures reduce light pollution by producing less blue light and relying on warm light colors. These fixtures keep the stars visible and reduce energy usage.
Pro Tip: Choose moisture-sealed fixtures. They’ll be more durable in rain and snow.
Choose Your Ground
The first step to installing a stunning DIY lighting scheme is to plot the right layout. As you decide where to put lights, think about your lawn maintenance routine. Avoid light placements that will make it difficult to mow the lawn or tackle weeds. Respect neighbors’ space by keeping light off of their lawn. Post height is also important. A taller post will illuminate a broader area and the light will less concentrated.
Preparing the yard is next on the list. Set the lights on the lawn where you want to place them. Roll out your cable to ensure that you have enough for the entire yard. Plan around obstacles such as trees, bushes, rocks and irrigation lines. Many counties and cities require that homeowners request dig permission before beginning a project, so contact your municipality’s utility notification center or digging hotline.
Can You Dig It?
Get the dig site ready by mowing the lawn, clearing away leaves and giving yourself an easy-to-navigate work area. Make sure you have a square-blade shovel for this step.
- With your lawn clear, you can turn over the sod where the lights will go. Use the blade of the shovel to slide underneath the grass and separate it from the soil.
- Detach sod in one piece. It should measure at least 12 inches wide. Fold the detached sod over onto itself, leaving half of the soil exposed.
- Test the lighting fixture in the soil. Do not drive it into the ground yet, but make sure that the fixture does not hang over onto the driveway, road or sidewalk.
- Using the square-bladed shovel, create a narrow, shallow trench along the path you laid out for your wiring.
Pro Tip: A trench provides the ideal location for underground wiring. The trench only needs be 2 to 3 inches deep. A deeper trench would make it difficult to connect the wiring to the light fixtures. Stick the blade of the shovel in the ground and move it back and forth to create a narrow V-shaped trench.
Installing the Wiring
This is the most technical part of learning how to install a post light, so take your time. Contact a professional if you feel unsafe at any time. Get the following tools ready:
- Narrow stick of 1/2-inch plywood or rounded tool handle
- Large screwdriver or long steel punch
- 12-gauge, 14-gauge or 16-gauge low voltage wire; the optimal wire varies between fixture types
- Transformer
- Torpedo level
- Voltage meter
Pro Tip: The wattage of the transformer must be enough to power all of the lights in the lighting plan. For example, if you install three 100-watt fixtures, you will need a 300-watt transformer.
- Before you get started, turn the power OFF at the breaker box. This is an important safety measure.
- Find the GFCI-protected outdoor electrical outlet. This is where the transformer will go.
- Take the low voltage wiring and strip the insulation off of the end. Remove between 1/2-inch and 3/4-inch of insulation. Attach each strand to the terminals on the transformer. Plug the transformer into the outlet, but keep it in the OFF position.
- Unwind the wire as you lay it along the trench. It does not have to be perfectly straight.
 Pro Tip: Do not pull the wire too tightly. A little bit of slack is optimal for safety and for future adjustments of lighting fixtures.
- Cut a small opening in the sod where each fixture will be installed.
- Use a long steel punch or a large screwdriver to drive a hole for each fixture’s stake. Make it deep enough that the top of the PVC footing is level with the ground.
- Pull a few inches of wiring up through each cut. This may involve pulling the sod closer to the dirt, but don’t fully cover the dirt yet. Take the connector halves on the bottom of the light fixture and slide them over the middle of the exposed cable. Pinch them together until they click.
- Press the lighting fixture into the prepared hole. Do not push the stake in, since it’s important to make sure the lights work before securing them.
- Install each light fixture, connecting the cables as you go. Turn the power on at the breaker box and then at the transformer box. Use a voltage meter to verify that each fixture is between 10.5 and 12 volts.
- If all of the light fixtures are working properly, turn them on at night. This gives you the chance to make any necessary changes to create a different effect.
- When the fixtures are working and placed exactly where you want them, use the stick of plywood or a tool handle to push the wiring firmly in the trench. Use a shovel to spread the dirt evenly over the cable.
- Replace the sod, laying it evenly over the dirt.
Finishing Touches
The major installation work is now behind you. It only takes a few more steps to get your lighting system up and running. You’ll need a torpedo level for this step. Grass seed is optional.
- Secure the light fixtures by pushing them all the way down. The bottom edge should be flush with the ground. This should also hide the cable.
- Hold a torpedo level vertically against the light post. If it is uneven, make any necessary changes before adding dirt and packing it in around the light fixture.
- If lighting installation left any bare spots along the trench line, add grass seed to help each fixture fit seamlessly in your landscape.
Bright Ideas for Outdoor Lighting
As you dream up an inspired outdoor lighting design, consider layering the light with a mix of task, ambient and accent fixtures. Layered lighting adds atmosphere, provides functionality and creates a cohesive look.
Combine path lights with accent lighting fixtures for layered lighting. Hidden accent lights such as in-ground well lights illuminate and highlight your beautiful garden, vintage fence or ivy-covered wall from below. Wall sconces add another complex layer to a lighting scheme, providing security and a welcoming glow in entryways. Rope or string lights provide ambiance from above, making it easy to extend your outdoor activities well into the evening. Use recessed lighting and step lighting to illuminate your pathways and guide visitors to the door. Alternate path lights and recessed lighting fixtures for a dramatic and creative look. Make sure that the various bulbs and fixtures you select complement each other.
Now that you know how to install a path light, you can choose from an array of fixtures and bulbs to create a design that suits your preferences. The steps are easy and the payoff is impressive. Ensure that you have all necessary supplies and tools on hand before you start and reach out for professional assistance if the need arises. Use lighting to make your outdoor area just as welcoming as the inside of your home.
Leave A Reply